Final Fantasy

ゲームガイド

Final Fantasy XIV: Guide to Play Viper (Patch 7.0)

, Comment regular icon0 comments

In this article, we bring you a guide on how to play Viper, and tips on how to improve yourself to get the most out of the new job!

Writer image

によって翻訳されました Meline Hoch

Writer image

によってレビュー Romeu

Edit Article

Final Fantasy XIV released its patch 7.0 with the Dawntrail expansion, and with it, players got access to a new physical DPS, the Viper.

With its own combo systems, the Viper requires some preparing to extract its full potential, and in this article, we will bring you a guide to begin your adventures in Tural smacking the game with the new job!

Unlocking the Viper

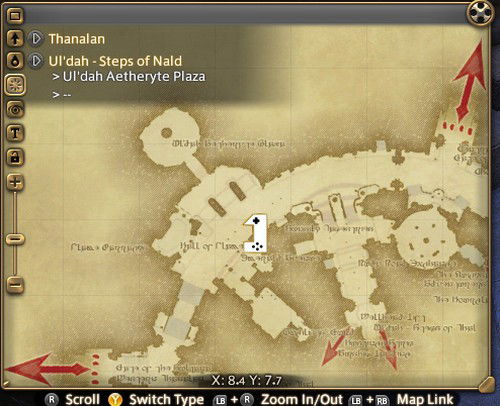
Before we begin, it will be necessary to own Dawntrail and at least one battle job at level 80. After that, just go to Ul’dah. The Enter the Viper Quest NPC will be right by the Aetheryte, as seen below:
Ad

Just go here in Ul’dah, close to the Aetheryte by the exit.

Basic Combo Flux

  • Initially, it’s better to ignore the Viper resource gauge.

  • The Viper brings a new style of using the already known Physical DPS, in which it takes only two buttons on your bar and these buttons switch in between as you advance your rotations.

  • The first attack used in the rotation will decide what the combo will do. By starting with Dread Fangs, it proceeds to a rotation focused on debuffing the enemy, causing them to take more damage from your attacks and granting you an Attack Speed bonus, while Steel Fangs is more focused on raw damage dealing.

  • Every time you end one of these combos, Serpent's Tail will trigger the finishing move Death Rattle, and you gotta use it. If another GCD is used, the window for this attack will be lost.

    With this in mind, the basic flux should look like this:
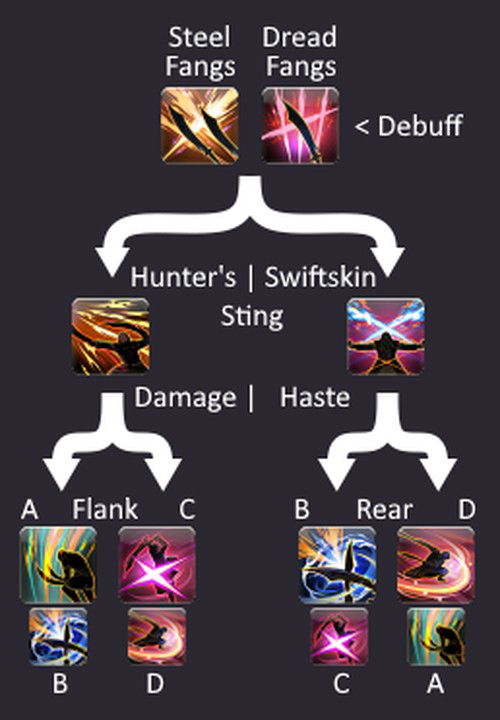
    Source: Icyveins
    Source: Icyveins

  • Looking at it, things can look complicated, but this job was made to be quite intuitive. After you get to practice the combos, it gets easier to follow the pacing.

  • The Viper slightly resembles how the Dancer works, but in this case, we don’t depend on random activations to trigger certain abilities.

  • An essential tip is to pay attention to the buffs you are granted by using Hunter's/Swiftskin Sting. This buff tells you what will be your next attack with its damage bonus and on its name you can also check which direction you must aim. If it shows something like “Hind” it’ll be in the back, and if it shows something like “Flank”, it’ll be on the flank.

    Your next base combo will be finished with the flank damage bonus
    Your next base combo will be finished with the flank damage bonus

    On this case, the bonus will be granted upon hitting the enemy’s back
    On this case, the bonus will be granted upon hitting the enemy’s back

  • Another important tip is to notice how the base combo skills that grant bonuses on flanks are shown in Green, and the ones that deal bonus damage to their backs are shown in Red.

    Dreadwinder - Serpent Offerings - Reawakening

    Dreadwinder

  • Dreadwinder works as an advanced combo, always comparing to what we’ve seen so far. Upon triggering it, the target gets the debuff from Dread Fangs’ rotation and two combo actions are unlocked to follow it: Hunter's Coil (flank damage bonus) and Swiftskin’s Coil (back damage bonus).

  • Upon choosing one of those actions, 2 oGDCs will be unlocked, and just like Death Rattle, you have to trigger them before your next GCD, which will be Twinfang Bite and Twinblood Bite in this case. It might look hard to double Weave with certain regions’ pings, however, both Hunter’s Coil and Swiftskin’s Coil have a 3-second GCD, and this GCD grants a better window to avoid losing its uptime.

    Ad

    Serpent Offerings and Reawakening

    Serpent Offerings’ Gauge
    Serpent Offerings’ Gauge

  • When executing certain attacks, with the Flanks and Hinds mentioned before, you will increase your gauge. With 50 charges, Reawaken can be used, which grants you 5 stacks you of Anguine Tribute that will be used to demolish whatever is ahead of you with a new combo, unlocked right after Reawaken’s cast.

  • It is also possible to activate Reawaken right after triggering Serpent's Ire, which grants you a use of the awakening with no costs on your gauge.

  • The combo itself is pretty intuitive, and it naturally replaces the attacks used in the base combo, for example, Steel Fangs > First Generation, Dread Fangs > Second Generation and so on, followed by Legacy oGCDs and finishing with Ouroboros, that replaces the Reawaken button.

  • There are also a few oGCDs to go with it, which make such combos’ usage quite dynamic.

  • Using Ouroboros will end your awakened phase, so use it only after finishing your complete Generations and Legacies combos.

    Rattling Coil and Uncoiled Fury

    Pay attention to the red crystals below the blades
    Pay attention to the red crystals below the blades

  • Here is where the Viper’s resource gauge makes its debut. Below it, there are three markers and that is where Rattling Coil’s charges are shown, consuming one per usage. It is a 3 seconds GCD, just like Hunter’s Coil and Swiftskin’s Coil, and right after being used, 2 oGCDs will be unlocked for immediate use as Uncoiled Twinfang and Uncoiled Twinblood.

    Area Combos’ Flux

    Just like single target combos, the Viper’s Area Attacks follow the same pattern, to the point that you can mimic your single attack setup as shown in the control setup below:
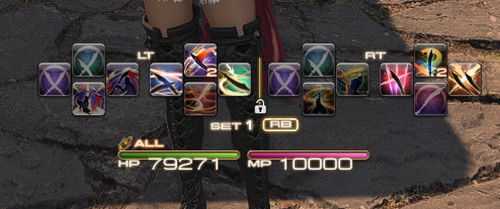
    Image content of the Website

  • Notice that the right bar is the single target rotation and the left one is for multiple targets. Except for Serpent's Tail, the same buttons are used. Two possible combo starters, generating an attack flux focused on damage, and the other to debuff enemies and buff yourself. Here is an example of how I prepared my bar, but feel free to set it up the way you feel it’s better!

    Burst Phase

    Now that we know exactly how it works, how can we extract the most from it?

  • Use the “Always be casting” rule, which is basically keeping your CGD rolling.

  • As the Viper doesn’t have a Raid Buff, your burst phase will depend more on your team, for example, in case you have a Ninja or a Scholar, it’s better to hold the awakened combo until when the enemy is under Trick Attack or Chain Stratagem’s effects.

  • Knowing the basics, let’s go to the rotation: start the fight by using Dreadwinder, followed by Serpent`s Ire. From there, keep the Dreadwinder combo, Reawaken and combo > Dreadwinder and combo.

    Ad

    Image content of the Website

    The Viper’s simplified Opener

    In practice, it looks something like this:

    Final Notes

    The Viper brings new stuff while it uses a lot of what is already in the game, having many similarities with other jobs, like the Reaper and the Gunbreaker. The easily adjustable rotation and visible windows of offensive oGCDs activations make it quite easier for learners to get used to a more frantic gameplay style.

    I hope that you enjoyed this article and that it helps you when trying out the Viper in Final Fantasy XIV, thanks for reading!