Mastering some utility pixels—like smokes, flashes, and Molotov cocktails—has long been a key factor in improving your ranking, whether in competitive or Premier League. Although this is an FPS, not everything is about aiming; your team's strategy will certainly make a difference in many matches.
With this in mind, we at UmGamer have created this guide on how to play Terrorist in CS2's Inferno. Check it out!
BOMB A
There are several ways to execute Bomb A, and a very important step is mastering the apps. We'll see the utilities for different inputs that will be launched from there.
That said, here's a fundamental flashbang to ensure an ally advances in that area. A few things to keep in mind: the video already makes it clear where you should position yourself and which pixel to aim at, but it's important to highlight three more points:

With the apps under control, and confident that you won't be shot at by anyone aiming there, you can perform a few other useful moves that will help with any entry your team intends to make.
If your main focus is the apps itself, check out one of the best bang options you can use to facilitate your allies' entry.
Crouching, you'll position yourself on the second wooden pillar—just like in the video below—and aim at the left corner of the divider between the gray and white parts of that chimney. Still crouching, throw it with the left mouse button—don't stand up or use a jump throw.
Note that it will hit most CTs targeting the door, especially those in the graveyard or at the beginning of the bomb. One difference is that this flash takes a long time to appear in the defenders' view, meaning they have virtually no time to react and escape its effect.
The last utility, designed for those trying to enter through the apps, is to displace enemies on the balcony. This Molotov is quite simple to throw, but it's useful for slower entry, as it burns the exit from the apps itself.
There are Molotov cocktails that can hit both the balcony and double balcony, but we didn't include them in this article because they're extremely susceptible to change with a small pixel shift.
Another common execution Terrorists perform on Bomb A is through A short. In this case, I recommend an excellent Smoke and Flash combination. They'll be launched from the middle and the apps, respectively, so be sure to secure these locations first.
A major problem for Terrorists invading through A short is having to deal with several different picks. CTs can be found in the graveyard or the pit next to it, in addition to the bomb itself and other areas.
With this in mind, a smoke shot from the middle can block the exit to the library and moto. It's one of the simplest in today's article. Keep your character between the red and white parts of the wall and aim for the first block in the upper right corner. After that, use a jump throw with the left mouse button and you'll be successful.
Not only will it block the view of those there, but it’ll also hinder the movement of those coming from Bomb B to help.
Another great aid for your teammates advancing on A short is this flashbang used on the apps. Obviously, you'll need to advance to this spot first—and the first two flashes taught in this article are perfect for that.
With freedom, position yourself as in the video and aim at the second vertical pole of the fence. Play with the left mouse button, no secrets.
From A short’s perspective, the utility weapon will explode behind the box, which is excellent for not hindering your team. At the same time, everyone in the Bomb, cemetery, and library who is waiting for their allies will be hit.
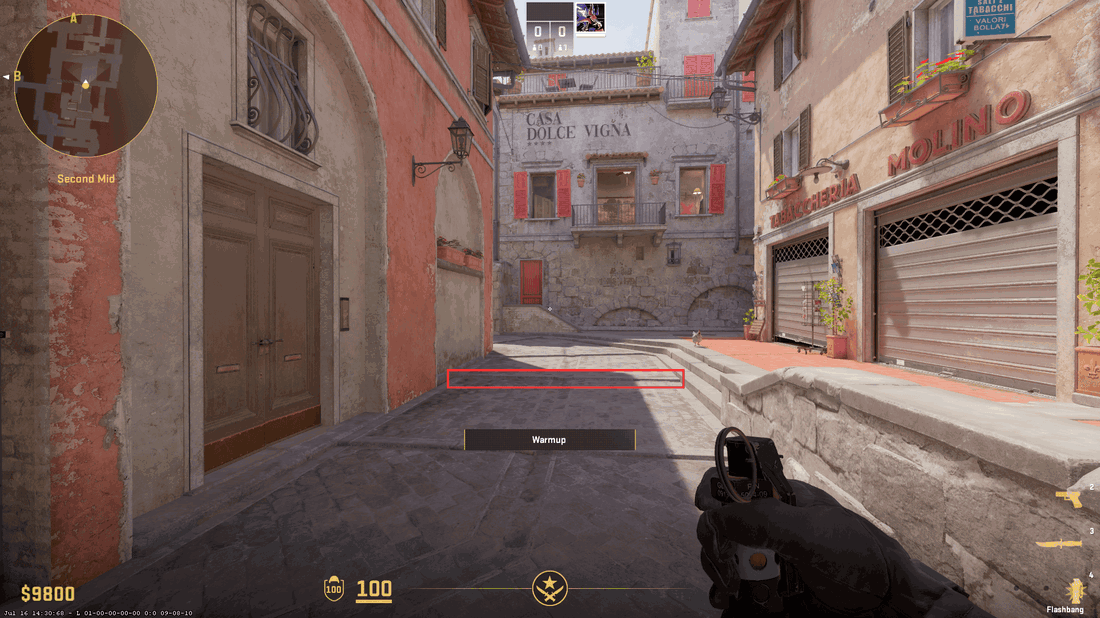
Now, if you want to advance through A long, I recommend two essential smokes: the arch and the library. These locations are fatal for eliminating your allies, and you can mitigate the problem with this utility weapon sequence.
Both are used in the second mid and use the jump throw with the left mouse button, but each deserves its own point of attention. The first one shown in the video is for the arch; this requires you to be standing and aiming at the tip of the roof—aligned with the left corner of that V.
In the library smoke, make sure you're crouched and, thus, aim for the right corner of the last piece of wood. However, in addition to the jump throw, you need to press W to move forward a little when throwing—this is essential for hitting the pixel.
It might be considered the most difficult today, but there's not much of a secret. Just press W when you jump throw. If necessary, practice a bit before performing it in competition.
Since there are two smokes made from the same location, you can ask another teammate to buy one and leave it there.
Still thinking about improving A long's entrance, we've added a flash to the graveyard. Its premise is very similar to the previous one: blinding everyone except your allies.
To cast it, simply crouch in front of the same pillar and aim slightly above the roof, with your vision aligned with the window. Importantly, move forward slightly before throwing it; this movement is necessary for the flash to travel further and thus avoid hitting your teammates' eyes.
Finally, a slightly different strategy, but widely used in competitive play, is also worth mentioning. Instead of using the A long to always invade Bomb A, you can create a smoke that blocks the view of the enemies located there and, in effect, enter B through the Arch and CT base.
With complete control of the middle, go to the beginning of the A long and, standing still, aim for the third diamond in the window. Now, perform a jump throw with the left mouse button.
This smoke opens up a variety of plays for your team. Typically, a CT defending B will go to the base or arch to assist the enemy, making a push to Banana even more effective.
And without the vision of Bomb A, you can enter Arch with the entire team and finish off the defending CT, leaving even a Lurker at the Banana. Or just one or two enter there while the majority push to B.
Middle
Most of the utilities used in the middle are to trigger an A input, either through A short or A long, which we already covered in the last topic. Since this area is quite linear and doesn't offer much variety, we've selected a single smoke that will be enough to start mastering this space.
This pixel can be safely used, as it's very close to your base. Follow the steps in the video below and use the jump throw with the left mouse button.
BOMB B
Bomb B is also more predictable and linear than Bomb A. Because it's a more compact area and most advances occur through Banana, there isn't as much variety in the entry.
The CT base and coffins smokes are almost always required, unless you want to execute an extremely specific strategy, and I recommend memorizing them.
Starting at CT, aim for the upper left corner of the roof and fire with the left click normally, without crouching or using a jump throw. Note that this utility doesn't prevent a defender from positioning himself at CT Boost.
There's another version that can block both CT and CT Boost, but I don't recommend it without consistent training because it's a very variable pixel size. Any change completely alters the utility weapon's trajectory—see the grenade camera in the video below.
To neutralize the coffins enemy, check out the move below. You'll release smoke with the left mouse button while remaining crouched.
Pay attention to the exact pixel where I place it, aligned to the right corner of the second lamp, but slightly above the wire. While not as inconsistent as the previous smoke, it can sometimes give the CT positioned on top of the coffins a gap, allowing them to see behind the smoke if they fire a few shots.
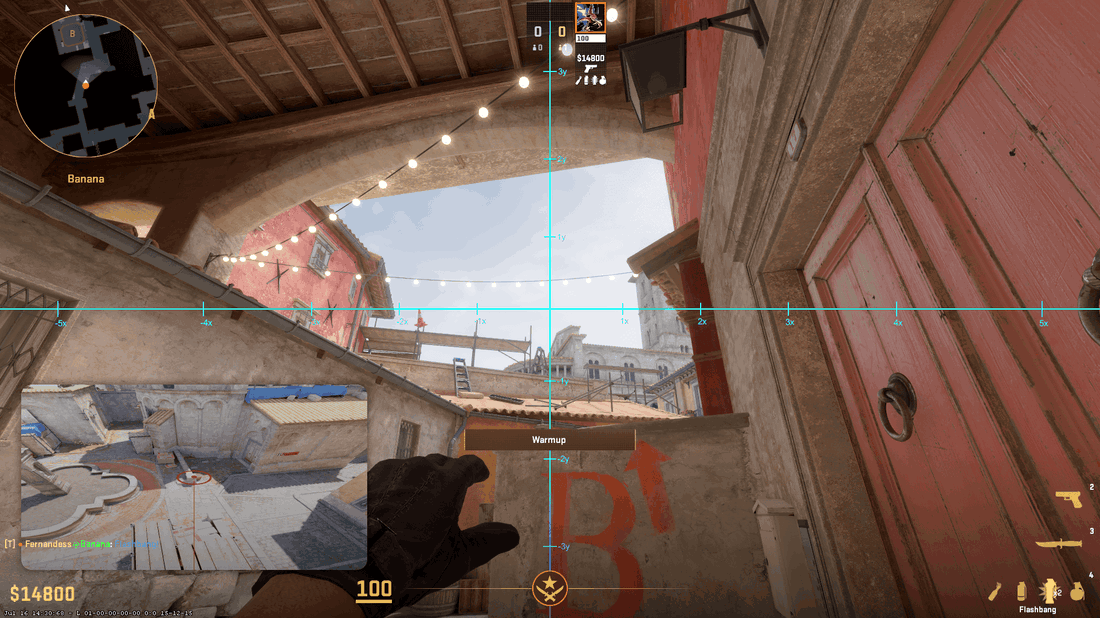
We've already finished the Inferno smokes, and now we'll move on to the final flashbang. Since most of the advances on B are through the Banana, it's normal for all enemies to be facing it. This flashbang is excellent for surprising them, as it explodes immediately after appearing.
Remember to align the sight with the pillar I shoot at in the video, the height may vary, but if you want a precise measurement, you can use the top of the cone, just like I do in the image below.

Finally, three Molotovs will be the key to your B entry; some spots are already well-known to CS2 players. Many CTs, in addition to the base and the coffin, like to stay in the Quad, Dark, and BTT 1st and 2nd.
Starting with the Quad, it's important to strictly follow the pixel used in the video, or practice a few times, to execute the best Molotov possible. Sometimes, a slight deviation can cause it to come out crooked and leave a space behind the wall for the opponent to stay hidden—note that this doesn't happen in the video below—your goal is to make them completely escape the area.
Other than that, there are no secrets; just perform a standard throw with the left mouse button.
To burn the Dark, you'll need one of your ally's "feet" to climb the Banana wall. After that, aim slightly to the right—no precise measurement needed—from the pole under the window and use a jump throw, again with the left mouse button.
The last tip in this video is a Molotov cocktail capable of burning any enemy in BTT 1st and 2nd, as well as the Boost (box) between them. It's the most complicated of the three, but nothing a little practice can't fix.
You should lean against the box in front of the banana barrels and, crouching, jump and quickly press W—the idea is to climb right onto the edge of one of the barrels. It's not difficult if you've stayed crouched.
Afterward, you'll see a brush- or leaf-shaped spot. Stand up and aim precisely at the tip of it. Now use a jump throw by right-clicking while simultaneously pressing W—no need to hold it down, just press W and Spacebar when jumping. If you don't use it, your Molotov cocktail will fall onto the roof and have no effect.
Conclusion
I hope this article helped you better understand the utility options available at Inferno. I'm available if you have any questions or suggestions.


— Comments 0
, Reactions 1
Be the first to comment