


So, you're telling me you want to become the one who decides who lives and who dies in my group, the one everyone begs for a fraction of your power so they can withstand all the evils thrown at them? You've come to the right place! In this guide, I'll outline the main mechanics dedicated to Healers and give you some tips for doing well with each of them!
General concepts and mechanics of Healers
Slidecast

Swiftcast and Rezz
Positioning
Weaving and GCD usage
Role Actions
Esuna

Lucid Dreaming
Surecast
Repose
Rescue
Resurrection Spells
Which Healer is best for you? Shield Healer or Regen Healer?
What is a Shield Healer?

What is a Regen Healer?
Conjurer/White Mage - Regen Healer - Free Trial - Starter

Main Mechanics
Lilys and You
Blood for the Blood Lily!
Support and Utilities
General Tips
Arcanist/Scholar - Shield Healer - Free trial - Starter

Eos and You
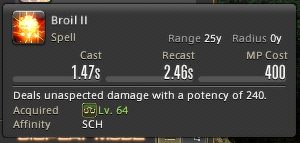
Main mechanics
How does it work?
Support and Utilities
General Tips
Astrologian - Regen Healer - Free Trial - LV 50

Main Mechanics
Support and Utilities
General Tips
Sage - Endwalker - LV 70

Main Mechanics
How does Kardia work?
Addersgail
Addersting
Okay, but how does it work?

— Comentarios 0
, Reacciones 1
Se el primero en comentar